Here are our FAQ’s
This is the draft core content to go in the Volunteering page… it lists volunteer roles and then skills..
Bar Steward

Be the friendly face that welcomes guests to our bar at socials, parties and other events.. Serve drinks and process payments. Help us tidy up at the end of the evening!
Fancy dress is optional!
What a Bar Steward does:
- Sets up and runs the bar at Beech Social Events
- Tidies up after the event
How to get the skills:
How to keep us all safe?
In signing up to support our community we ask our volunteers to understand and comply with our core values and beliefs as defined in these policies:
How to report a problem or incident?
Here the numbers to call for immediate help. After the incident please ensure the details are reported using this Problem reporting form or email [email protected]
In case of Accident, Injury or Safeguarding concern:
|
What |
What/Where |
Call |
|
Emergency |
|
999 |
|
Not sure what to do? |
NHS 111 can help if you have an urgent medical problem |
111 |
|
Defibrillator |
Outside the front entrance on the right |
(dial 999 for assistance) |
|
First Aid kit |
In the Village Hall kitchen |
|
|
Hospital A&E |
Basingstoke NHS Foundation Trust, Aldermaston Rd, Basingstoke, RG24 9NA |
01256 473202 |
|
Doctors Surgery |
Chawton Park Surgery, Chawton Park Road, Alton, GU34 1RJ |
01420 542542 Out of hours: 0208 390 9991 |
|
Safeguarding |
Emergency |
999 |
|
Child or Adult in danger |
101 |
|
|
Report a concern about a child |
0300 555 1384 |
|
|
Report a concern about an adult |
0300 555 1386 |
How to submit an expense claim?
To be reimbursed for expenses incurred in supporting our Charity please use this online form:
The form is primarily designed for submitting claims for baking and milk expenses for our Coffee shop but you can use it for other expenses:
- You will need to provide your bank details (if we dont already have them)
- Please remember to scan and attach a receipt
- Expense are normally paid monthly so please let us know if yours are urgent
How to use Zettle point of sale (PoS)
How to use our Zettle point of sale system?
Beech Village Hall has 2 Zettle Point of Sale systems already set up for taking payments.
We can use the system to take payments for food, drinks and tickets using:
- Cash
- Card
- Payment links
To use one of the systems you will need:
- Access to the one of the machines
- The PIN code to access the system
- Please email [email protected] for this
- To ensure the iPad and card reader are charged
- Or alternativlely, you can set up your own device or web browser to take payments
- Please email [email protected] for help on setting this up
To use the Zettle app
- Turn on the iPad
- Enter the PIN code
- Check you are in the Zettle app, if not select the Zettle app from the menu
- Navigate the screen to select the items you wish to add to the ‘shopping cart’
- You can select an item multiple times or update the quantity from the shopping cart.
- Select payment type
- We prefer to not accept cash if we are handling food as if you touch money you MUST wash your hands
- We prefer card payments, just select ‘Card’
- The iPad will then connect to the card reader
- If you have problems connecting to the card reader you can go into the settings menue and attempt to reconnect to the reader.
- The card reader will display the amount and the customer can tap or insert their card or phone
- Sometimes customers are required to insert their card and enter their PIN
- Once payment is confirmed you will be given the option to email a receipt to the customer, to do this you/they will need to enter an email address
|
Sell
|
1. You should be at the ‘Sell’ screen on the iPad 2. Select product. If you make an error you can delete and start again 3. Tap ‘Card’ button at bottom right of screen (if cash or card is enabled) 4. The amount should now be displayed on the card reader 5. Ask the customer to tap or swipe their card |
|
Receipt (sent via email) |
1. Click the button in the top left of the iZettle screen 2. Select the ‘Receipt’ menu item 3. Identify and select the transaction by the amount and last 4 digits of the card 4. Click on the ‘envelope’ icon at the bottom of the screen 5. Enter the email address of the customer |
|
Refund |
1. Click the button in the top left of the iZettle screen 2. Select the ‘Receipt’ menu item 3. Identify the transaction by the amount and last 4 digits of the card number 4. Click on the transaction 5. Click on REFUND 6. The customer will then need to represent their card. |
|
Free drink for Bar staff
|
1. From the SELL screen select the drink 2. On the right hand side press the discount button 3. Enter 100% 4. Enter cash and finish the transaction 5. Please note the discount applies to the entire shopping cart |
iZettle problems
|
No connection to card reader |
Check reader is powered on and has charge |
Power button is top right of iZettle card reader Plug into charger |
|
|
Check reader is connected to iZettle software |
From iZettle app on iPad: Click top left menu button Select ‘Settings’ Select ‘Card reader’ Check status
|
How to do the role?
Once you have signed up for the role and completed any training, just let us know which events you would like to support. It normally helps if you are paired with someone who has done the role before!
Before the event
- Obtain the FLOAT tin
- The tin has the bar cash float and also the keys to get in
- Check with Social team on who is buying the fresh beer
- Plan on arriving early to set up the bar area
- On arrival
- Wash your hands
- Check your hands for cuts and cover with a plaster (in the first aid box)
- Put on a clean apron
- Run the bar set up instructions
During the event
- Make a note to let us know if customers ask for drinks that we do not stock.
- If you run out of any drinks check the hall stock cupboard (middle locked cupboard) for additional stock
- Place empty bottles, cans and recyclable items in the plastic ‘trug’ for recycling.
At the end of the event
- Run the through the bar tidy up instructions
- Lock up
- Return the FLOAT tin to the Treasurer.
- Take the empty bottles
After the event
- Let us know if there were any problems or incidents using the Problem report
- Let us know if there were any special requests
- Take the empty bottles and cans home or to a recycling point (there is a bottle bank at the back of Iceland in Alton)
Burger Flipper
Always in demand at our Summer events! Help us organise and run our BBQ’s!

How to get the skills:
BBQ safety
Gas, charcoal and disposable BBQs are safe when used responsibly and our BBQ safety tips are designed to ensure you stay safe. Follow our BBQ safety tips and enjoy your al fresco cooking without any risks (except for a bit of overindulging!).
BBQ safety checklist
The following BBQ safety advice contains all the essential points to keep in mind when cooking with a BBQ:
- Never use a BBQ indoors.
- This includes any temporary outdoor shelter such as tents, marquees, yurts, gazebos, playhouses, shepherd huts or igloos!
- Don’t take a lit or smouldering BBQ into a tent, caravan, or cabin. Even when you have finished cooking with it, a BBQ can still give off fumes that can give you carbon monoxide poisoning. You should always leave it outside.
- The cooking area should be well away from buildings and be well ventilated with fresh air.
- Be aware of the signs of carbon monoxide poisoning:
- Headaches
- Nausea
- Breathlessness
- Dizziness
- Collapse
- Loss of consciousness
- Always use your BBQ in accordance with the operating instructions.
- Check the BBQ for damage before use.
- When using your BBQ ensure that it is on a level ground. In the case of disposable BBQs, use on a non-combustible surface
- Ensure disposable BBQs are cold before disposing responsibly into refuse containers. Even a slightly warm BBQ could cause a fire.
Extinguishing a Grease Fire on Your Propane Grill
 Usually, cooking food on a propane grill is a cinch. But any time you’re dealing with fire and grease, accidents are always a possibility – and it’s important for you to know exactly what to do, and not to do, if you have a grease fire or flare-up.
Here’s the scoop about grease fire safety on your propane grill:
- Stay ready:
- When you grill, have a cell phone nearby in case you need to make an emergency call
- Keep a fire extinguisher, gloves and either baking soda, sand or kosher salt near your grill to extinguish flames.
- If you have a fire and it’s safe to do so,
- Turn off the grill’s burners.
- Remove the food and smother the flames by throwing baking soda, sand or kosher salt over it. NEVER use water to extinguish a grease fire or flare up.
- Close the lid and any grill vents to further starve the fire of oxygen.
- If the propane tank has become part of the fire, or if the fire expands out of control, evacuate the area immediately and call the fire department.
How To Avoid Grease Fires and Flare-ups
Of course, the best way to deal with grease fires and flare-ups is to avoid them in the first place. Here are the best ways to do it.
- Clean your grill regularly, following instructions from your manufacturer. Regular cleaning will greatly reduce the risk of a fire (your food will taste better, too).
- Grease sometimes pools in the fire box area around the burners. If it is safe to do so, turn off the gas and leave the lid open so the grease can burn off.
- Always cook with the lid down, and leave it down during cooking time.
- Oil the food, not the grates.
- If you experience a grease flare-up,
- Immediately move the food to a warming rack, using long-handled tongs
- Slowly re-place food at center of the grill to let fat burn off; continue this process for each item.
- Once all food has been returned to the grill, finish cooking with a watchful eye.
Gas BBQ maintenance tips
- If you’re using a gas BBQ here are some additional safety tips to keep you safe while cooking. These tips can also be applied to other gas devices like a camping stove, light, or heater:
-
Before use, check that the BBQ is in good working order and any hoses are not showing signs of wear, stiffness or cracking. If you have any doubts about the safety of a gas BBQ do not use it and contact a Gas Safe registered engineer.
- When changing your gas cylinder turn off the gas taps, and always change the cylinder in the open air.
- Don’t over-tighten joints.
- Always turn off the gas cylinder before turning off the BBQ controls to ensure that any gas left in the pipeline is used up.
- The instructions that come with your BBQ should detail how to check for gas leaks. This often involves coating joints with a leak detection solution and then watching for bubbles. Be sure to follow these instructions before using the BBQ to check for any problems. If you find a leak do not use the BBQ and consult the instructions for further advice.
- Leave gas powered stoves, lights, or heaters outside in the fresh air at all times to prevent carbon monoxide build up.
- ALWAYS follow and consult the manufacturer’s instructions for appliance specific advice on use, ventilation, maintenance and care.
- Gas components, on any appliance, should only be repaired or replaced by a competent person and this includes your BBQ
- Storage – At the end of the season thoroughly clean your BBQ, do not leave the cylinder connected when not in use, and store it in a dry environment.
Liquid petroleum gas (LPG) powered products are a feature of many summers, taken along on camping trips, to festivals, or keeping you warm on the patio in the evening. You can find out more safety advice on LPG equipment here.
Food hygiene
| What? | How? |
|
Clean hands through handwashing. Wash your hands frequently throughout the session and always after:
|
|
| Clean and germ free surfaces through cleaning and disinfection | FSA Cleaning video |
|
Handle enquiries about allergens in our products.
|
|
| Serving food | Use a tool, not your hands eg cake slice or tongs |
| Minimise cross contamination |
Use different tools to serve different food types. |
| Fresh food and milk |
Only use fresh food and milk Do not store food and milk for more than 24 hours. |
| Clean clothes and an apron | Always wear clean clothes and a clean apron when serving food. |
How to keep us all safe?
In signing up to support our community we ask our volunteers to understand and comply with our core values and beliefs as defined in these policies:
How to report a problem or incident?
Here the numbers to call for immediate help. After the incident please ensure the details are reported using this Problem reporting form or email [email protected]
In case of Accident, Injury or Safeguarding concern:
|
What |
What/Where |
Call |
|
Emergency |
|
999 |
|
Not sure what to do? |
NHS 111 can help if you have an urgent medical problem |
111 |
|
Defibrillator |
Outside the front entrance on the right |
(dial 999 for assistance) |
|
First Aid kit |
In the Village Hall kitchen |
|
|
Hospital A&E |
Basingstoke NHS Foundation Trust, Aldermaston Rd, Basingstoke, RG24 9NA |
01256 473202 |
|
Doctors Surgery |
Chawton Park Surgery, Chawton Park Road, Alton, GU34 1RJ |
01420 542542 Out of hours: 0208 390 9991 |
|
Safeguarding |
Emergency |
999 |
|
Child or Adult in danger |
101 |
|
|
Report a concern about a child |
0300 555 1384 |
|
|
Report a concern about an adult |
0300 555 1386 |
How to submit an expense claim?
To be reimbursed for expenses incurred in supporting our Charity please use this online form:
The form is primarily designed for submitting claims for baking and milk expenses for our Coffee shop but you can use it for other expenses:
- You will need to provide your bank details (if we dont already have them)
- Please remember to scan and attach a receipt
- Expense are normally paid monthly so please let us know if yours are urgent
Cake curator
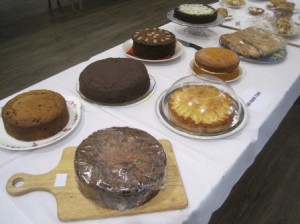
Help us by preparing beautiful and delicious home made cakes for sales at the the Beech Coffee and Cake shop!
- Prepare and bake the cakes
- Deliver to the shop on Friday morning
- Comply with our Food Hygiene policies including ingredient and sell by labelling
How to get the skills:
Food hygiene
| What? | How? |
|
Clean hands through handwashing. Wash your hands frequently throughout the session and always after:
|
|
| Clean and germ free surfaces through cleaning and disinfection | FSA Cleaning video |
|
Handle enquiries about allergens in our products.
|
|
| Serving food | Use a tool, not your hands eg cake slice or tongs |
| Minimise cross contamination |
Use different tools to serve different food types. |
| Fresh food and milk |
Only use fresh food and milk Do not store food and milk for more than 24 hours. |
| Clean clothes and an apron | Always wear clean clothes and a clean apron when serving food. |
How to keep us all safe?
In signing up to support our community we ask our volunteers to understand and comply with our core values and beliefs as defined in these policies:
How to report a problem or incident?
Here the numbers to call for immediate help. After the incident please ensure the details are reported using this Problem reporting form or email [email protected]
In case of Accident, Injury or Safeguarding concern:
|
What |
What/Where |
Call |
|
Emergency |
|
999 |
|
Not sure what to do? |
NHS 111 can help if you have an urgent medical problem |
111 |
|
Defibrillator |
Outside the front entrance on the right |
(dial 999 for assistance) |
|
First Aid kit |
In the Village Hall kitchen |
|
|
Hospital A&E |
Basingstoke NHS Foundation Trust, Aldermaston Rd, Basingstoke, RG24 9NA |
01256 473202 |
|
Doctors Surgery |
Chawton Park Surgery, Chawton Park Road, Alton, GU34 1RJ |
01420 542542 Out of hours: 0208 390 9991 |
|
Safeguarding |
Emergency |
999 |
|
Child or Adult in danger |
101 |
|
|
Report a concern about a child |
0300 555 1384 |
|
|
Report a concern about an adult |
0300 555 1386 |
How to submit an expense claim?
To be reimbursed for expenses incurred in supporting our Charity please use this online form:
The form is primarily designed for submitting claims for baking and milk expenses for our Coffee shop but you can use it for other expenses:
- You will need to provide your bank details (if we dont already have them)
- Please remember to scan and attach a receipt
- Expense are normally paid monthly so please let us know if yours are urgent
Coffee Grinder
Help by running a monthly 3 hour shift of 2 people at the Beech Coffee and Cake shop preparing fresh coffee and teas and serving our home made cakes.
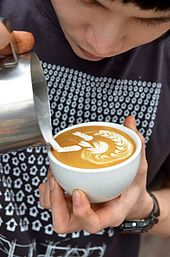
What a Coffee Grinder does:
Coffee Grinder (smile and serve a 3 hour shift)
- Regularly wash hands and keep surfaces clean at all times.
- Take orders using point of sale system
- Take payments using point of sales system
- Prepare drinks and food
- Serve drinks and food
- Collect used crockery and run through dishwasher
- Curate our sound system
- Take feedback and suggestions for improvement
Link to the manual: Coffee grinder manual
How to get the skills:
Coffee
Golden rules:
- Ask the customer how they prefer their coffee
- Start the milk preparation first
- One at a time
Heat!
- Make sure the cup is pre-heated
- Make sure the portafilta is hot (always keep it in the centre station)
The best way to learn is by practise… please arrange for some hands on practise by emailing [email protected]
Our coffee
Our coffee beans
|
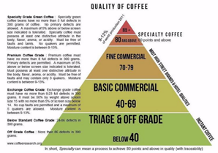
We source our ‘SPECIALITY’ grade arabica roasted coffee beans from Moon Roast who are a ‘specialist’ roaster; Source coffee as directly from origin as we are able, and our high-grade, 100% Arabica beans comes straight from small farms in coffee-growing countries like Rwanda, Kenya and Guatemala. Our coffee is seasonally selected at the roastery through the process of sample roasting and cupping when shipments of new season coffee have landed. |
Moon Roast Blend Composition
|
A quick guide to coffee drinks
The ‘coffee’ drink can be extracted from ground roasted coffee beans in a variety of ways.
- Espresso machine
- Hand held espresso maker
- Stovetop espresso maker
- Aeropress
- French press
- Coffee bag
- Vacuum / siphon pot
- Percolator
- Manual pour over coffee makers
- Machine pour over coffee makers
We have selected to serve Espresso based coffee drinks.
Espresso is a method of brewing coffee that uses high water pressure and ‘tamped’ ground beans to make a small concentrated ‘shot’ that is also called an Espresso.
|
Espresso (/ɛˈsprɛsoʊ/ ( listen), Italian: [eˈsprɛsso]) is a coffee-brewing method of Italian origin,[1] in which a small amount of nearly boiling water (about 90 °C or 190 °F) is forced under 9–10 bars (900–1,000 kPa; 130–150 psi) of pressure (expressed) through finely-ground coffee beans. Espresso coffee can be made with a wide variety of coffee beans and roast degrees. Espresso is the most common way of making coffee in southern Europe, especially in Italy, Spain, Portugal, Switzerland, Southern France and Bulgaria. Espresso is generally thicker than coffee brewed by other methods, with a viscosity of warm honey. This is due to the higher concentration of suspended and dissolved solids, and the crema on top (a foam with a creamy consistency).[2] As a result of the pressurized brewing process, the flavors and chemicals in a typical cup of espresso are very concentrated. The three dispersed phases in espresso are what make this beverage unique. The first dispersed phase is an emulsion of oil droplets. The second phase is suspended solids, while the third is the layer of gas bubbles or foam. The dispersion of very small oil droplets is perceived in the mouth as creamy. This characteristic of espresso contributes to what is known as the body of the beverage. These oil droplets preserve some of the aromatic compounds that are lost to the air in other coffee forms. This preserves the strong coffee flavor present in the espresso.[3] Espresso is also the base for various coffee drinks—including caffè latte, cappuccino, caffè macchiato, caffè mocha, flat white, and caffè Americano. |
|
Source: Wikipedia |
The Espresso ‘shot’ is the basis for a variety of coffee drinks based on adding extra water and or types of frothed milk.
Our coffee machine
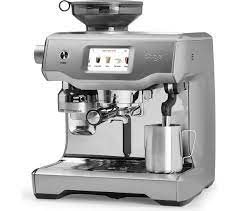
Sage Oracle Touch best practice:
Tips: www.youtube.com/watch?v=V8246awntvM
- Maintain the same quantity of beans in the hopper (regularly top up)
- Pre-warm portafilta by keeping in the brew head
- Pre-warm cups by keeping on warming tray of machine or use hot water
- Wipe down portafilta with clean damp paper towel before use
- Occasionally flush brew head by pressing brew without portafilta in place for 5 seconds and then wipe down with damp paper towel
Our Espresso set up:
Our machine is set up to automatically dispense a standard ‘double Espresso’:
Coffee grinder setting of 15
Weight of ground coffee 20g
Brew time of 30 seconds
Delivers approx. 40 ml of Espresso
How to serve our coffees:
|
Name |
Machine setting |
|
Qty of coffee |
Cup size |
Qty of milk |
Qty of water |
Notes |
|
Espresso |
BVH Espresso |
40 ml (double) |
3 oz (85 ml) |
None |
None |
Machine set up is: Coffee grinder setting of 15 Weight of ground coffee 20g Brew time of 30 seconds Delivers approx. 40 ml of Espresso |
|
|
Macchiato |
BVH Latte |
40 ml (double) |
3 oz (85 ml) |
2 spoons |
None |
One or two spoons of milk froth on top of an Espresso |
|
|
Cortado |
40 ml (double) |
6 oz (170 ml) |
40 ml |
None |
Espresso topped with 50% steamed mill |
||
|
Flat white |
40 ml (double) |
6 oz (170 ml) |
120 ml |
None |
Espresso topped up with 2/3 steam milk and a fine layer of foam on top (<1 cm) |
||
|
Latte |
40 ml (double) |
8 oz (227 ml) |
180 ml |
None |
Espresso topped up with 2/3 steam milk and a fine layer of foam on top (1-2 cm) |
||
|
Cappuccino |
BVH Cappucino |
40 ml (double) |
10 oz (284 ml) |
180 ml |
None |
Espresso topped with 1/3 steamed milk and 1/3 dry foam. A traditional cappuccino has an even distribution of espresso, steamed milk, and foamed milk (2-4 cm) How to make one: www.youtube.com/watch?v=wRe3Z9ogDaA |
|
|
Americano |
BVH Americano |
40 ml (double) |
8 oz (227 ml) |
None |
140 ml |
Water with Espresso added. 2/3’s hot water How to make one: |
|
|
Long Black |
40 ml (double) |
8 oz (227 ml) |
None |
120 ml |
Water with Espresso added. 2/3’s hot water |
Food hygiene
| What? | How? |
|
Clean hands through handwashing. Wash your hands frequently throughout the session and always after:
|
|
| Clean and germ free surfaces through cleaning and disinfection | FSA Cleaning video |
|
Handle enquiries about allergens in our products.
|
|
| Serving food | Use a tool, not your hands eg cake slice or tongs |
| Minimise cross contamination |
Use different tools to serve different food types. |
| Fresh food and milk |
Only use fresh food and milk Do not store food and milk for more than 24 hours. |
| Clean clothes and an apron | Always wear clean clothes and a clean apron when serving food. |
How to keep us all safe?
In signing up to support our community we ask our volunteers to understand and comply with our core values and beliefs as defined in these policies:
How to report a problem or incident?
Here the numbers to call for immediate help. After the incident please ensure the details are reported using this Problem reporting form or email [email protected]
In case of Accident, Injury or Safeguarding concern:
|
What |
What/Where |
Call |
|
Emergency |
|
999 |
|
Not sure what to do? |
NHS 111 can help if you have an urgent medical problem |
111 |
|
Defibrillator |
Outside the front entrance on the right |
(dial 999 for assistance) |
|
First Aid kit |
In the Village Hall kitchen |
|
|
Hospital A&E |
Basingstoke NHS Foundation Trust, Aldermaston Rd, Basingstoke, RG24 9NA |
01256 473202 |
|
Doctors Surgery |
Chawton Park Surgery, Chawton Park Road, Alton, GU34 1RJ |
01420 542542 Out of hours: 0208 390 9991 |
|
Safeguarding |
Emergency |
999 |
|
Child or Adult in danger |
101 |
|
|
Report a concern about a child |
0300 555 1384 |
|
|
Report a concern about an adult |
0300 555 1386 |
How to submit an expense claim?
To be reimbursed for expenses incurred in supporting our Charity please use this online form:
The form is primarily designed for submitting claims for baking and milk expenses for our Coffee shop but you can use it for other expenses:
- You will need to provide your bank details (if we dont already have them)
- Please remember to scan and attach a receipt
- Expense are normally paid monthly so please let us know if yours are urgent
How to use our coffee machine?
Please note that we do not normally hire out our coffee machine. Please contact us at [email protected] if you would like to use it.
Sage Oracle Touch best practice:
Tips: www.youtube.com/watch?v=V8246awntvM
- Maintain the same quantity of beans in the hopper (regularly top up)
- Pre-warm portafilta by keeping in the brew head
- Pre-warm cups by keeping on warming tray of machine or use hot water
- Wipe down portafilta with clean damp paper towel before use
- Occasionally flush brew head by pressing brew without portafilta in place for 5 seconds and then wipe down with damp paper towel
|
Prepare coffee Prepare milk |
|
|
Understand best practice in using the Sage Oracle Touch |
|
|
Add water
Add beans |
|
|
Clean the machine Empty the drip tray |
|
Our Espresso set up:
Our machine is set up to automatically dispense a standard ‘double Espresso’:
Coffee grinder setting of 15
Weight of ground coffee 20g
Brew time of 30 seconds
Delivers approx. 40 ml of Espresso
How to use Zettle point of sale (PoS)
How to use our Zettle point of sale system?
Beech Village Hall has 2 Zettle Point of Sale systems already set up for taking payments.
We can use the system to take payments for food, drinks and tickets using:
- Cash
- Card
- Payment links
To use one of the systems you will need:
- Access to the one of the machines
- The PIN code to access the system
- Please email [email protected] for this
- To ensure the iPad and card reader are charged
- Or alternativlely, you can set up your own device or web browser to take payments
- Please email [email protected] for help on setting this up
To use the Zettle app
- Turn on the iPad
- Enter the PIN code
- Check you are in the Zettle app, if not select the Zettle app from the menu
- Navigate the screen to select the items you wish to add to the ‘shopping cart’
- You can select an item multiple times or update the quantity from the shopping cart.
- Select payment type
- We prefer to not accept cash if we are handling food as if you touch money you MUST wash your hands
- We prefer card payments, just select ‘Card’
- The iPad will then connect to the card reader
- If you have problems connecting to the card reader you can go into the settings menue and attempt to reconnect to the reader.
- The card reader will display the amount and the customer can tap or insert their card or phone
- Sometimes customers are required to insert their card and enter their PIN
- Once payment is confirmed you will be given the option to email a receipt to the customer, to do this you/they will need to enter an email address
|
Sell
|
1. You should be at the ‘Sell’ screen on the iPad 2. Select product. If you make an error you can delete and start again 3. Tap ‘Card’ button at bottom right of screen (if cash or card is enabled) 4. The amount should now be displayed on the card reader 5. Ask the customer to tap or swipe their card |
|
Receipt (sent via email) |
1. Click the button in the top left of the iZettle screen 2. Select the ‘Receipt’ menu item 3. Identify and select the transaction by the amount and last 4 digits of the card 4. Click on the ‘envelope’ icon at the bottom of the screen 5. Enter the email address of the customer |
|
Refund |
1. Click the button in the top left of the iZettle screen 2. Select the ‘Receipt’ menu item 3. Identify the transaction by the amount and last 4 digits of the card number 4. Click on the transaction 5. Click on REFUND 6. The customer will then need to represent their card. |
|
Free drink for Bar staff
|
1. From the SELL screen select the drink 2. On the right hand side press the discount button 3. Enter 100% 4. Enter cash and finish the transaction 5. Please note the discount applies to the entire shopping cart |
iZettle problems
|
No connection to card reader |
Check reader is powered on and has charge |
Power button is top right of iZettle card reader Plug into charger |
|
|
Check reader is connected to iZettle software |
From iZettle app on iPad: Click top left menu button Select ‘Settings’ Select ‘Card reader’ Check status
|
How to do the job
Before your shift
- Make sure you are fit and well. Please let us know if you are not feeling well!
- Prepare your ‘playlist’ of music.
- Wear comfortable shoes and clean clothes!
- Make sure you have your name badge
On arrival
- Wash your hands
- Put on a clean apron
- Check your hands for cuts and cover with a plaster
- Attach your name badge
- Check availability of cakes and biscuits and update chalkboard
During your shift
- Remember to use the drinking water tap to fill kettles and the coffee machine
- Regularly check the coffee machine (see best practice)
- Wash your hands regularly
- Gather up dirty crockery and run through the dishwasher
End of shift
- Detach your name badge from you apron
- Return your apron so we can clean it
Fire Marshall

Support our Social Events including:
- Events at the village hall
- Our annual Bonfire and Fireworks
Job role
- Ensure fire escapes are not blocked during an event
- Lead the evacuation of the hall in the event of a fire
- Know how to test the fire alarm system
- Undertake risk assesssments
What skills are required and how to get them?
Can we use candles?
As per our ‘Terms and Conditions’ :
No naked lights, including candles, are permitted without prior consent of the Bookings
Manager.
We recommend the use of flameless LED candles as we discourage the use of candles due to:
- The increased risk of fire from naked flames
- The probability that the smoke from the flames may trigger our smoke detectors and fire alarm which in turn will potentially disrupt the event
Our consent to the use of candles would be based on your plan for the appropriate management of the risks.
How to reduce the risk of candle flames starting fires?
- Always put candles on a heat resistant surface. Be especially careful with night lights and tea lights, which get hot enough to melt plastic.
- Put them in a proper holder. Candles need to be held firmly upright by the holder so they won’t fall over. The holder needs to be stable too, so it won’t fall over either
- The holder edge should be higher than the height of the candle flame
- Position them away from curtains. Don’t put candles near curtains or other fabrics – or furniture. And keep them out of draughts
- Keep clothes and hair away. If there’s any chance you could lean across a candle and forget it’s there, put it somewhere else. You don’t want to set fire to your clothes or your hair
- Keep children and pets away. Candles should be out of reach of children and pets
- Keep candles apart. Leave at least four inches (10cm) between two burning candles
- Take care with votive or scented candles. These kinds of candles turn to liquid to release their fragrance, so put them in a glass or metal holder
- Don’t move them when they’re burning. Extinguish candles before moving them. Also, don’t let anything fall into the hot wax like match sticks
- Don’t leave them burning. Extinguish candles before you leave a room. Never go to sleep with a candle still burning. And never leave a burning candle or oil burner in a child’s bedroom
- Use a snuffer or a spoon to put them out. It’s safer than blowing them, which can send sparks and hot wax flying
- Double check they’re out. Candles that have been put out can go on smouldering and start a fire. Make sure they’re completely out.
How to reduce the risk of candles setting off fire alarms
- Keep candles away from fire alarms and smoke detectors. The smoke from a candle can easily travel to a smoke detector and set it off. Place candles at least 3 feet away from smoke detectors.
- Keep candles in a well-ventilated area. A well-ventilated area will help to disperse the smoke from a candle, making it less likely to set off a smoke alarm.
- Don’t leave candles unattended. Always keep an eye on candles when they are burning. If you need to leave the room, blow out the candles.
- Trim wicks to millimetres or 1/4 of an inch. Long wicks can produce more smoke, which can increase the risk of setting off a smoke alarm.
- Clean your smoke detectors regularly. A dirty smoke detector may not be able to detect smoke properly, which could increase the risk of a fire.
- Plant-based wax candles: Finally, using candles that are designed to burn cleanly and produce less smoke, such as soy wax or rapeseed wax candles, can also reduce the risk of triggering a smoke alarm.
Hall User Guide
To help you prepare to use our Hall we have prepared our User Guide.
This document is essential reading to help you plan for a successful event! It’s structured into the following sections:
- Planning for success
- Preparing for the worst
- In the event of fire
- When your arrive
- During your event
- Before you leave
- As you leave
- After your event
How to use our equipment:
Can I bring a USB stick to upload my file?
No, we only accept files transferred electronically.
- Our digital signs are run by a system called Yodeck which allows us to schedule different content to run on each screen.
- Any content has to be uploaded to the Yodeck system and then scheduled to play.
Can I use a projector?
We have projectors to hire in our:
- Main Hall (plus a large drop down screen)
- Annexe meeting room
When you make you booking request please let us know if you would also like to hire the projector.
Connection to the projectors is via VGA or HDMI.
How do I send my file to you?
Please send a single file no larger than 100Mb.
Most email clients limit the size of attachments to no more than 20 or 25Mb.
You can email small files to:
For larger file you will need to use a tool like WeTransfer or a file sharing tools like Microsoft OneDrive, Googledrive.
Please allow plenty of time to send the file to us.
How to control the Annexe Heater?
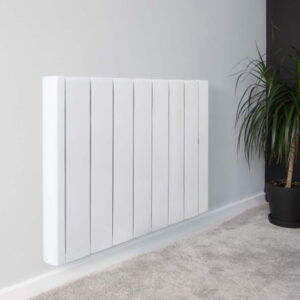
The annexe meeting room has a wifi controlled electric heater. The heater is scheduled to heat the room when the room is being used.
To overide the temperature settings you can use Alexa voice control in the room.
| To change the temperature say: |
Effect |
|
Changes the set temperature to XX degrees C |
|
Increases the set temperature by 1 degree C |
|
|
|
|
|
Decreases the set temperature by 1 degree C |
|
|
|
If all else fails, here is the link to download the instruction manual for the Ecostrad IQ ceramic heater
How to use the big screen in the entrance hall to share my pictures?
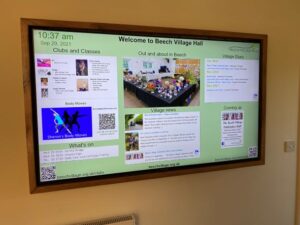
If you have booked one of our packages you are welcome to use our digital signage system. The system includes:
- The large TV screen in the main corridor
- A smaller monitor in the lounge bar area
- Software to schedule the dispaly
For example, you might want to show a static welcome page, a table plan or a scrolling selection of family photographs.
You will need to provide us with the material one week in advance.
You will need to provide us with:
- A Powerpoint, pdf or .mov file containing the material you wish to show, at least 7 days in advance of the hire date.
- By default, we will schedule your material so that it appears on the screen during the hours you have booked the Hall. If you only want it to show for a specific period of time, let us know.
- If you provide a multi page PDF or PPT file, each page will appear for 5 seconds by default. This can be adjusted if you let us know how long you want each page to appear for.
Please note:
- The TV screen is managed remotely by us and you will not be able to make any changes onsite.
- There is no provision for sound on this system.
- It is your responsibility to ensure that you have the appropriate approvals to use the material you send us. This may include copyright or a licence for images, and permission from people appearing in the pictures (or, where applicable, their parents or guardians).
- To deliver this service, we will upload the file you provide onto the platform of our service provider, Yodeck. We will delete all your materials from the platform shortly after your event
How to use the DIshwasher in the kitchen?
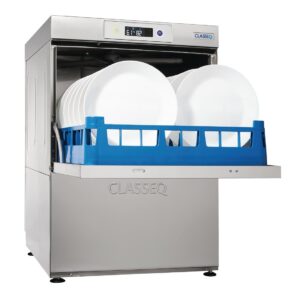
The dishwasher is a ‘commercial’ dishwasher. Unlike a home dishwasher, the system is reliant on pre heating the water to enable a rapid cycle time. This works well if you follow a few simple instructions
- Allow 20-40 minutes for the machine to pre-heat
- Always rinse food debris off the plates before washing
- Always remember to follow the draining down instructions at the end of the event
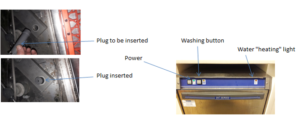
To operate the dishwasher please use the buttons on the front of the machine:

- On/Off button
- Cycle button
- Cycle indicator
- Heating indicator
Turning on the machine
To turn on the machine ensure the door is closed and press the On/Off button (1) on the keypad of the machine, the display will illuminate, the machine will start to fill automatically as long as the door is closed.
Once the wash tank is filled and both tanks are up to the required temperatures the heating indicator will illuminate green to indicate the machine is ready to run a cycle.
- This will take approximately 20-40 minutes.
- During the fill stage the heating indicator (4) will flash amber.
Loading a basket
Before loading a basket rinse off any food waste:
- Always remove excess food/debris from any dishes/glasses to be washed. DO NOT use the machine as a waste disposal unit.
Long cutlery, such as ladles and long knives etc., must be placed horizontally on the open basket this will avoid possible collision with wash/rinse arms.
Starting a cycle
To start a cycle, follow the instructions below.
- Open the door
- Load the full basket, ensuring that bottom and top arms rotate freely.
- Close the door
- Press the cycle button (2).
- The cycle will start once the machine has achieved its correct water levels and temperatures.
- During the cycle the blue cycle indicator (3) will be illuminated blue.
- The cycle will run for approximately 3 minutes.
- At the end of the cycle, once the cycle indicator (3) has gone out. Open the door and remove the basket
- Reload the machine and repeat as required.
Please note:
- Do NOT open the door during a cycle
- The machine has a heat interlock to ensure that the rinse is in accordance with environmental health requirements. This will extend the wash cycle if the rinse boiler has not achieved the required temperature.
- If the cycle button is pressed before the machine has reached the required levels the cycle indicator (3) will illuminate blue to indicate that a cycle has been selected, the heating indicator (4) will flash amber and the machine will automatically start when the requirements have been met.

items in the basket may be wet and will dry in a short time due to evaporation.
Be aware: Items may be hot when removed from machine
Draining down the machine
It is very important the machine is drained down at the end of each working day. To fully drain down the machine follow these instructions:
- Close the door to the machine
- Press the On/Off button (1) to turn off the machine.
- Press the cycle button (2)
- The cycle indicator (3) will flash blue.
- The machine will drain down the wash tank.
- The machine will do a self-rinse.
- When the cycle indicator (3) goes out the drain cycle is complete.
How to use the sound system?
The easiest way to use our sound system is via a Bluetooth connection.

- You need to be in the far right corner of the main hall to connect
- You should connect your phone/laptop to the device named ‘Adastra’
- You will then be able to play music from your phone/laptop and also control the volume level.
Please note:
- Connect to our wifi first to improve streaming
- You will need to keep your bluetooth device within range of our amplifier
Alternatively, you can connect by cable:
 We have male jack plus that you can plug into a computer or mixing desk. Please contact us so we can help you set this up.
Is there a limit on the volume of music?
As we are located in a quiet and peaceful village with close neighbours we specify a maximum noise level in our terms and conditions.
- We ask that windows and external doors are closed when loud music is being played inside the hall.
- We prohibit the playing of music outside of the hall without our express permission.
We have a number of system to help monitor and control noise levels:
- A sound decibel meter to enable hirers to understand the noise level in real time
- A noise monitoring service provided by Minut that records the noise level in the hall. Please note that we do not record conversations. Please use this link for the Minut privacy policy
- A noise limiting system. The noise limiter has two parts”:
- A ‘traffic light’ display in the main hall. The light flash orange as the noise level nears the limit and red when the limit is exceeded
- A power cutout to the main hall when the noise limit is exceeded for more than 10 seconds.
What format of digital file do you require to use the screen in the entrance hall?
For the large screen in the entrance hall you shoud create a single digital file:
- Landscape format with an aspect ratio of 1920 x 1080 (16:9)
For the small screen in the lounge/bar area:
- Portrait format with an aspect ratio of 1920 x 1080
We can process most file formats eg PPT, MOV, JPG and PDF.
We request you limit the size of the file to a maximum of 100Mb.
We hope this covers everything you need to plan and prepare for a successful event. We also have our Frequently Asked Questions page and should you have any problems our Problem Reporting page
For further information, please e-mail us or call 07501 187496 (office hours only).
How to hire the Marquee?
We have a large Marquee measuring 6m x 12m and this can be placed on our village green outside the hall. The Marquee has side panels but does not have a floor.

The Marquee is available for hire where the hirer commits to set up and take down the Marquee.
- Setting up and taking down the Marquee requires a team of 10 people for 2-3 hours
- The video below steps through the process for a similar marquee.
How to keep us all safe?
In signing up to support our community we ask our volunteers to understand and comply with our core values and beliefs as defined in these policies:
How to report a problem or incident?
Here the numbers to call for immediate help. After the incident please ensure the details are reported using this Problem reporting form or email [email protected]
In case of Accident, Injury or Safeguarding concern:
|
What |
What/Where |
Call |
|
Emergency |
|
999 |
|
Not sure what to do? |
NHS 111 can help if you have an urgent medical problem |
111 |
|
Defibrillator |
Outside the front entrance on the right |
(dial 999 for assistance) |
|
First Aid kit |
In the Village Hall kitchen |
|
|
Hospital A&E |
Basingstoke NHS Foundation Trust, Aldermaston Rd, Basingstoke, RG24 9NA |
01256 473202 |
|
Doctors Surgery |
Chawton Park Surgery, Chawton Park Road, Alton, GU34 1RJ |
01420 542542 Out of hours: 0208 390 9991 |
|
Safeguarding |
Emergency |
999 |
|
Child or Adult in danger |
101 |
|
|
Report a concern about a child |
0300 555 1384 |
|
|
Report a concern about an adult |
0300 555 1386 |
How to submit an expense claim?
To be reimbursed for expenses incurred in supporting our Charity please use this online form:
The form is primarily designed for submitting claims for baking and milk expenses for our Coffee shop but you can use it for other expenses:
- You will need to provide your bank details (if we dont already have them)
- Please remember to scan and attach a receipt
- Expense are normally paid monthly so please let us know if yours are urgent
How to test and reset the fire alarm points?

Test:
- Check that the light on the front flashes green every 40 seconds.
- This indicates it has power.
- Press the black spot and the white element will drop down exposing the yellow edge to show it is activated.
- The light will turn red and stay on continuously for 3 seconds and then continue to flash red (every 20 seconds) for 5 minutes indicating transmission of the alarm signal.
- After 5 minutes the alarm signal and the smoke alarms will stop.
- This prevents the batteries in the Manual Call Point and the alarm from being depleted).
Check:
- Alarm audible in each room.
- Kitchen smoke shutter lowered.
Reset:
- Use the plastic key by pushing the forked end (arrow side up) into the slots (see Figure 1)
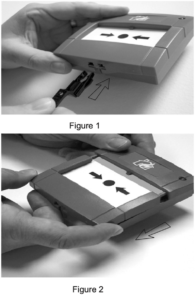 Pull the bottom housing down (see Figure 2)
- Remove the plastic key.
- Now push the bottom housing firmly against the back and slide upwards.
- This resets the switch.
- The yellow strip on the white element should now be hidden.
- If the Manual Call Point is not reset the light will flash red every 40 seconds to remind the user to reset it.
- If the light flashes amber every 9 seconds this indicates that the batteries are depleted
Reset kitchen smoke shutter using key from keysafe.
In the event of Fire
Who is responsible?
The Hirer or the Event organiser is deemed the “Responsible Person” and is designated the person in charge of the Hall/Room during the hire period or event.
Prior to your event you must make a plan of who and how you will manage the evacuation of your guests in the event of a fire. We detail how to do this in our User Guide and document below the summary.
Before the event
|
Appoint and brief your ‘Fire Marshalls’ |
In the event of a Fire you must have a plan to evacuate the building. You must:
|
When you arrive
Review the emergency procedures on the hall noticeboard
- The action to be taken in event of fire
- The location and use of fire equipment
- Escape routes and the need to keep them clear.
- That all fire exits are unlocked and you know how to open them,
- The importance of closing fire doors in the event of a fire and that any fire doors are not wedged open.
- That exit signs are clear.
- Any potential fire hazards on the premises are supervised.
In the event of a fire
|
What to do when a fire is detected? |
|
|
How to trigger the Fire Alarm? |
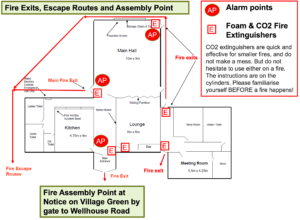
Use the Fire Alarm points in the Entrance or Main Hall as marked on the drawing below. |
|
Should we use the fire extinguishers? |
Attempts to extinguish the fire using the extinguishers should only be carried out if it is considered safe. If in any doubt, get out of the building. |
|
Where are the Fire Extinguishers? |
The Fire Extinguishers are marked on the drawing below. |
|
Which type of fire extinguisher should we use? |
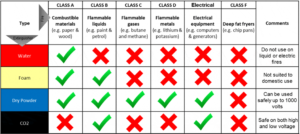 |
|
How to use the Fire Extinguishers? |
P: Pull the pin on the fire extinguisher. A: Aim the extinguisher nozzle toward the base of the fire. S: Squeeze the handle or lever to discharge the extinguisher. S: Sweep the nozzle back and forth, aiming at the base of the fiew. |
|
How to evacuate from the building? |
The Fire Exits are marked on the drawing below |
|
Where to assemble? |
The Fire Assembly Point is on the village green by the children’s play area. |
|
How to check everyone is out of the building? |
|
|
How to call the Fire Brigade? |
Call 999 And give the address: Beech Village Hall. Wellhouse Road, Beech, Alton, Hampshire GU34 4AD. |
|
After the fire |
Please ensure you report any incident to us. or email |
Green Guardian
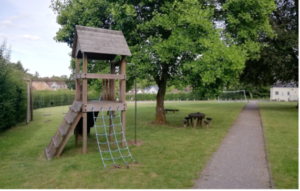
Help to keep our Village Green and Recreation Ground tidy! Dog poo monitor, dustbin putter outer, noticeboard monitor!
What skills are required and how to get them?
How to keep us all safe?
In signing up to support our community we ask our volunteers to understand and comply with our core values and beliefs as defined in these policies:
How to report a problem or incident?
Here the numbers to call for immediate help. After the incident please ensure the details are reported using this Problem reporting form or email [email protected]
In case of Accident, Injury or Safeguarding concern:
|
What |
What/Where |
Call |
|
Emergency |
|
999 |
|
Not sure what to do? |
NHS 111 can help if you have an urgent medical problem |
111 |
|
Defibrillator |
Outside the front entrance on the right |
(dial 999 for assistance) |
|
First Aid kit |
In the Village Hall kitchen |
|
|
Hospital A&E |
Basingstoke NHS Foundation Trust, Aldermaston Rd, Basingstoke, RG24 9NA |
01256 473202 |
|
Doctors Surgery |
Chawton Park Surgery, Chawton Park Road, Alton, GU34 1RJ |
01420 542542 Out of hours: 0208 390 9991 |
|
Safeguarding |
Emergency |
999 |
|
Child or Adult in danger |
101 |
|
|
Report a concern about a child |
0300 555 1384 |
|
|
Report a concern about an adult |
0300 555 1386 |
How to submit an expense claim?
To be reimbursed for expenses incurred in supporting our Charity please use this online form:
The form is primarily designed for submitting claims for baking and milk expenses for our Coffee shop but you can use it for other expenses:
- You will need to provide your bank details (if we dont already have them)
- Please remember to scan and attach a receipt
- Expense are normally paid monthly so please let us know if yours are urgent
Waste handling
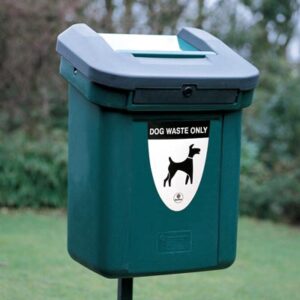
Dog poo is hazadous!
Dog fouling is a major concern to many people, not just because of the mess it causes, but because it can be a health risk. Dogs may deposit roundworm eggs (toxocara canis) in their faeces, which become infectious after about 3 weeks, and can remain so for up to 2 years.
Anyone, but particularly children playing near to the ground, can run the risk of picking up and swallowing the eggs. The eggs then hatch in the intestine, burrow through the intestine wall into the blood stream and pass into the body.
Possible symptoms of toxocaral infection range from aches, dizziness and nausea to asthma and pneumonia, but as these symptoms can all be caused by other things, infections often go undiagnosed. In the UK there are around 100 cases of toxocariasis diagnosed each year.
In rare cases eye disease and loss of vision can be caused when the toxocara larva passes through the eye.
Safe handling
Always:
- Wear disposable gloves
- Double bag waste
- Avoid touching your face
- Wash your hands after collection
Gunpowder plotter (fireworks!)

One of the great traditions of Beech Village is our annual torch lit procession, fireworks and bonfire! There is a lot of preparation and coordination of a large team to make the event a success!
One of the key roles in organising and running the event is the Gunpowder Plotter.
What they do:
- Plan the event
- Organise the bonfire
- Organise the fireworks
- Help with set up
- Launch the fireworks
- Help with tidy up
What skills are required and how to get them?
Firework training and skills
The UK Explosives Industry Group publishes guides for Firework displays:
https://www.eig2.org.uk/new-guides-for-firework-displays/
The document to review is:
Giving Your Own Firework Display – The Red Firework Guide
How to keep us all safe?
In signing up to support our community we ask our volunteers to understand and comply with our core values and beliefs as defined in these policies:
How to report a problem or incident?
Here the numbers to call for immediate help. After the incident please ensure the details are reported using this Problem reporting form or email [email protected]
In case of Accident, Injury or Safeguarding concern:
|
What |
What/Where |
Call |
|
Emergency |
|
999 |
|
Not sure what to do? |
NHS 111 can help if you have an urgent medical problem |
111 |
|
Defibrillator |
Outside the front entrance on the right |
(dial 999 for assistance) |
|
First Aid kit |
In the Village Hall kitchen |
|
|
Hospital A&E |
Basingstoke NHS Foundation Trust, Aldermaston Rd, Basingstoke, RG24 9NA |
01256 473202 |
|
Doctors Surgery |
Chawton Park Surgery, Chawton Park Road, Alton, GU34 1RJ |
01420 542542 Out of hours: 0208 390 9991 |
|
Safeguarding |
Emergency |
999 |
|
Child or Adult in danger |
101 |
|
|
Report a concern about a child |
0300 555 1384 |
|
|
Report a concern about an adult |
0300 555 1386 |
How to submit an expense claim?
To be reimbursed for expenses incurred in supporting our Charity please use this online form:
The form is primarily designed for submitting claims for baking and milk expenses for our Coffee shop but you can use it for other expenses:
- You will need to provide your bank details (if we dont already have them)
- Please remember to scan and attach a receipt
- Expense are normally paid monthly so please let us know if yours are urgent
Social Event helper!

Join the team to help organise and run our Social Events!
How to get the skills:
Food hygiene
| What? | How? |
|
Clean hands through handwashing. Wash your hands frequently throughout the session and always after:
|
|
| Clean and germ free surfaces through cleaning and disinfection | FSA Cleaning video |
|
Handle enquiries about allergens in our products.
|
|
| Serving food | Use a tool, not your hands eg cake slice or tongs |
| Minimise cross contamination |
Use different tools to serve different food types. |
| Fresh food and milk |
Only use fresh food and milk Do not store food and milk for more than 24 hours. |
| Clean clothes and an apron | Always wear clean clothes and a clean apron when serving food. |
Hall User Guide
To help you prepare to use our Hall we have prepared our User Guide.
This document is essential reading to help you plan for a successful event! It’s structured into the following sections:
- Planning for success
- Preparing for the worst
- In the event of fire
- When your arrive
- During your event
- Before you leave
- As you leave
- After your event
How to use our equipment:
Can I bring a USB stick to upload my file?
No, we only accept files transferred electronically.
- Our digital signs are run by a system called Yodeck which allows us to schedule different content to run on each screen.
- Any content has to be uploaded to the Yodeck system and then scheduled to play.
Can I use a projector?
We have projectors to hire in our:
- Main Hall (plus a large drop down screen)
- Annexe meeting room
When you make you booking request please let us know if you would also like to hire the projector.
Connection to the projectors is via VGA or HDMI.
How do I send my file to you?
Please send a single file no larger than 100Mb.
Most email clients limit the size of attachments to no more than 20 or 25Mb.
You can email small files to:
For larger file you will need to use a tool like WeTransfer or a file sharing tools like Microsoft OneDrive, Googledrive.
Please allow plenty of time to send the file to us.
How to control the Annexe Heater?

The annexe meeting room has a wifi controlled electric heater. The heater is scheduled to heat the room when the room is being used.
To overide the temperature settings you can use Alexa voice control in the room.
| To change the temperature say: |
Effect |
|
Changes the set temperature to XX degrees C |
|
Increases the set temperature by 1 degree C |
|
|
|
|
|
Decreases the set temperature by 1 degree C |
|
|
|
If all else fails, here is the link to download the instruction manual for the Ecostrad IQ ceramic heater
How to use the big screen in the entrance hall to share my pictures?

If you have booked one of our packages you are welcome to use our digital signage system. The system includes:
- The large TV screen in the main corridor
- A smaller monitor in the lounge bar area
- Software to schedule the dispaly
For example, you might want to show a static welcome page, a table plan or a scrolling selection of family photographs.
You will need to provide us with the material one week in advance.
You will need to provide us with:
- A Powerpoint, pdf or .mov file containing the material you wish to show, at least 7 days in advance of the hire date.
- By default, we will schedule your material so that it appears on the screen during the hours you have booked the Hall. If you only want it to show for a specific period of time, let us know.
- If you provide a multi page PDF or PPT file, each page will appear for 5 seconds by default. This can be adjusted if you let us know how long you want each page to appear for.
Please note:
- The TV screen is managed remotely by us and you will not be able to make any changes onsite.
- There is no provision for sound on this system.
- It is your responsibility to ensure that you have the appropriate approvals to use the material you send us. This may include copyright or a licence for images, and permission from people appearing in the pictures (or, where applicable, their parents or guardians).
- To deliver this service, we will upload the file you provide onto the platform of our service provider, Yodeck. We will delete all your materials from the platform shortly after your event
How to use the DIshwasher in the kitchen?

The dishwasher is a ‘commercial’ dishwasher. Unlike a home dishwasher, the system is reliant on pre heating the water to enable a rapid cycle time. This works well if you follow a few simple instructions
- Allow 20-40 minutes for the machine to pre-heat
- Always rinse food debris off the plates before washing
- Always remember to follow the draining down instructions at the end of the event
To operate the dishwasher please use the buttons on the front of the machine:

- On/Off button
- Cycle button
- Cycle indicator
- Heating indicator
Turning on the machine
To turn on the machine ensure the door is closed and press the On/Off button (1) on the keypad of the machine, the display will illuminate, the machine will start to fill automatically as long as the door is closed.
Once the wash tank is filled and both tanks are up to the required temperatures the heating indicator will illuminate green to indicate the machine is ready to run a cycle.
- This will take approximately 20-40 minutes.
- During the fill stage the heating indicator (4) will flash amber.
Loading a basket
Before loading a basket rinse off any food waste:
- Always remove excess food/debris from any dishes/glasses to be washed. DO NOT use the machine as a waste disposal unit.
Long cutlery, such as ladles and long knives etc., must be placed horizontally on the open basket this will avoid possible collision with wash/rinse arms.
Starting a cycle
To start a cycle, follow the instructions below.
- Open the door
- Load the full basket, ensuring that bottom and top arms rotate freely.
- Close the door
- Press the cycle button (2).
- The cycle will start once the machine has achieved its correct water levels and temperatures.
- During the cycle the blue cycle indicator (3) will be illuminated blue.
- The cycle will run for approximately 3 minutes.
- At the end of the cycle, once the cycle indicator (3) has gone out. Open the door and remove the basket
- Reload the machine and repeat as required.
Please note:
- Do NOT open the door during a cycle
- The machine has a heat interlock to ensure that the rinse is in accordance with environmental health requirements. This will extend the wash cycle if the rinse boiler has not achieved the required temperature.
- If the cycle button is pressed before the machine has reached the required levels the cycle indicator (3) will illuminate blue to indicate that a cycle has been selected, the heating indicator (4) will flash amber and the machine will automatically start when the requirements have been met.

items in the basket may be wet and will dry in a short time due to evaporation.
Be aware: Items may be hot when removed from machine
Draining down the machine
It is very important the machine is drained down at the end of each working day. To fully drain down the machine follow these instructions:
- Close the door to the machine
- Press the On/Off button (1) to turn off the machine.
- Press the cycle button (2)
- The cycle indicator (3) will flash blue.
- The machine will drain down the wash tank.
- The machine will do a self-rinse.
- When the cycle indicator (3) goes out the drain cycle is complete.
How to use the sound system?
The easiest way to use our sound system is via a Bluetooth connection.

- You need to be in the far right corner of the main hall to connect
- You should connect your phone/laptop to the device named ‘Adastra’
- You will then be able to play music from your phone/laptop and also control the volume level.
Please note:
- Connect to our wifi first to improve streaming
- You will need to keep your bluetooth device within range of our amplifier
Alternatively, you can connect by cable:
 We have male jack plus that you can plug into a computer or mixing desk. Please contact us so we can help you set this up.
Is there a limit on the volume of music?
As we are located in a quiet and peaceful village with close neighbours we specify a maximum noise level in our terms and conditions.
- We ask that windows and external doors are closed when loud music is being played inside the hall.
- We prohibit the playing of music outside of the hall without our express permission.
We have a number of system to help monitor and control noise levels:
- A sound decibel meter to enable hirers to understand the noise level in real time
- A noise monitoring service provided by Minut that records the noise level in the hall. Please note that we do not record conversations. Please use this link for the Minut privacy policy
- A noise limiting system. The noise limiter has two parts”:
- A ‘traffic light’ display in the main hall. The light flash orange as the noise level nears the limit and red when the limit is exceeded
- A power cutout to the main hall when the noise limit is exceeded for more than 10 seconds.
What format of digital file do you require to use the screen in the entrance hall?
For the large screen in the entrance hall you shoud create a single digital file:
- Landscape format with an aspect ratio of 1920 x 1080 (16:9)
For the small screen in the lounge/bar area:
- Portrait format with an aspect ratio of 1920 x 1080
We can process most file formats eg PPT, MOV, JPG and PDF.
We request you limit the size of the file to a maximum of 100Mb.
We hope this covers everything you need to plan and prepare for a successful event. We also have our Frequently Asked Questions page and should you have any problems our Problem Reporting page
For further information, please e-mail us or call 07501 187496 (office hours only).
How to hire the Marquee?
We have a large Marquee measuring 6m x 12m and this can be placed on our village green outside the hall. The Marquee has side panels but does not have a floor.

The Marquee is available for hire where the hirer commits to set up and take down the Marquee.
- Setting up and taking down the Marquee requires a team of 10 people for 2-3 hours
- The video below steps through the process for a similar marquee.
How to keep us all safe?
In signing up to support our community we ask our volunteers to understand and comply with our core values and beliefs as defined in these policies:
How to report a problem or incident?
Here the numbers to call for immediate help. After the incident please ensure the details are reported using this Problem reporting form or email [email protected]
In case of Accident, Injury or Safeguarding concern:
|
What |
What/Where |
Call |
|
Emergency |
|
999 |
|
Not sure what to do? |
NHS 111 can help if you have an urgent medical problem |
111 |
|
Defibrillator |
Outside the front entrance on the right |
(dial 999 for assistance) |
|
First Aid kit |
In the Village Hall kitchen |
|
|
Hospital A&E |
Basingstoke NHS Foundation Trust, Aldermaston Rd, Basingstoke, RG24 9NA |
01256 473202 |
|
Doctors Surgery |
Chawton Park Surgery, Chawton Park Road, Alton, GU34 1RJ |
01420 542542 Out of hours: 0208 390 9991 |
|
Safeguarding |
Emergency |
999 |
|
Child or Adult in danger |
101 |
|
|
Report a concern about a child |
0300 555 1384 |
|
|
Report a concern about an adult |
0300 555 1386 |
How to submit an expense claim?
To be reimbursed for expenses incurred in supporting our Charity please use this online form:
The form is primarily designed for submitting claims for baking and milk expenses for our Coffee shop but you can use it for other expenses:
- You will need to provide your bank details (if we dont already have them)
- Please remember to scan and attach a receipt
- Expense are normally paid monthly so please let us know if yours are urgent
How to use Zettle point of sale (PoS)
How to use our Zettle point of sale system?
Beech Village Hall has 2 Zettle Point of Sale systems already set up for taking payments.
We can use the system to take payments for food, drinks and tickets using:
- Cash
- Card
- Payment links
To use one of the systems you will need:
- Access to the one of the machines
- The PIN code to access the system
- Please email [email protected] for this
- To ensure the iPad and card reader are charged
- Or alternativlely, you can set up your own device or web browser to take payments
- Please email [email protected] for help on setting this up
To use the Zettle app
- Turn on the iPad
- Enter the PIN code
- Check you are in the Zettle app, if not select the Zettle app from the menu
- Navigate the screen to select the items you wish to add to the ‘shopping cart’
- You can select an item multiple times or update the quantity from the shopping cart.
- Select payment type
- We prefer to not accept cash if we are handling food as if you touch money you MUST wash your hands
- We prefer card payments, just select ‘Card’
- The iPad will then connect to the card reader
- If you have problems connecting to the card reader you can go into the settings menue and attempt to reconnect to the reader.
- The card reader will display the amount and the customer can tap or insert their card or phone
- Sometimes customers are required to insert their card and enter their PIN
- Once payment is confirmed you will be given the option to email a receipt to the customer, to do this you/they will need to enter an email address
|
Sell
|
1. You should be at the ‘Sell’ screen on the iPad 2. Select product. If you make an error you can delete and start again 3. Tap ‘Card’ button at bottom right of screen (if cash or card is enabled) 4. The amount should now be displayed on the card reader 5. Ask the customer to tap or swipe their card |
|
Receipt (sent via email) |
1. Click the button in the top left of the iZettle screen 2. Select the ‘Receipt’ menu item 3. Identify and select the transaction by the amount and last 4 digits of the card 4. Click on the ‘envelope’ icon at the bottom of the screen 5. Enter the email address of the customer |
|
Refund |
1. Click the button in the top left of the iZettle screen 2. Select the ‘Receipt’ menu item 3. Identify the transaction by the amount and last 4 digits of the card number 4. Click on the transaction 5. Click on REFUND 6. The customer will then need to represent their card. |
|
Free drink for Bar staff
|
1. From the SELL screen select the drink 2. On the right hand side press the discount button 3. Enter 100% 4. Enter cash and finish the transaction 5. Please note the discount applies to the entire shopping cart |
iZettle problems
|
No connection to card reader |
Check reader is powered on and has charge |
Power button is top right of iZettle card reader Plug into charger |
|
|
Check reader is connected to iZettle software |
From iZettle app on iPad: Click top left menu button Select ‘Settings’ Select ‘Card reader’ Check status
|
