Join the team to help organise and run our Social Events!
How to get the skills:
Food hygiene
| What? | How? |
|
Clean hands through handwashing. Wash your hands frequently throughout the session and always after:
|
|
| Clean and germ free surfaces through cleaning and disinfection | FSA Cleaning video |
|
Handle enquiries about allergens in our products.
|
|
| Serving food | Use a tool, not your hands eg cake slice or tongs |
| Minimise cross contamination |
Use different tools to serve different food types. |
| Fresh food and milk |
Only use fresh food and milk Do not store food and milk for more than 24 hours. |
| Clean clothes and an apron | Always wear clean clothes and a clean apron when serving food. |
Hall User Guide
To help you prepare to use our Hall we have prepared our User Guide.
This document is essential reading to help you plan for a successful event! It’s structured into the following sections:
- Planning for success
- Preparing for the worst
- In the event of fire
- When your arrive
- During your event
- Before you leave
- As you leave
- After your event
How to use our equipment:
Can I bring a USB stick to upload my file?
No, we only accept files transferred electronically.
- Our digital signs are run by a system called Yodeck which allows us to schedule different content to run on each screen.
- Any content has to be uploaded to the Yodeck system and then scheduled to play.
Can I use a projector?
We have projectors to hire in our:
- Main Hall (plus a large drop down screen)
- Annexe meeting room
When you make you booking request please let us know if you would also like to hire the projector.
Connection to the projectors is via VGA or HDMI.
How do I send my file to you?
Please send a single file no larger than 100Mb.
Most email clients limit the size of attachments to no more than 20 or 25Mb.
You can email small files to:
For larger file you will need to use a tool like WeTransfer or a file sharing tools like Microsoft OneDrive, Googledrive.
Please allow plenty of time to send the file to us.
How to control the Annexe Heater?
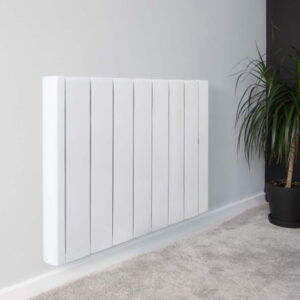
The annexe meeting room has a wifi controlled electric heater. The heater is scheduled to heat the room when the room is being used.
To overide the temperature settings you can use Alexa voice control in the room.
| To change the temperature say: |
Effect |
Alexa set heater to XX degrees |
Changes the set temperature to XX degrees C |
Alexa increase heater temperature |
Increases the set temperature by 1 degree C |
Alexa raise heater temperature |
|
Alexa make heater armer |
|
Alexa decrease heater temperature |
Decreases the set temperature by 1 degree C |
Alexa lower heater temperature |
|
Alexa make heater cooler |
If all else fails, here is the link to download the instruction manual for the Ecostrad IQ ceramic heater
How to use the big screen in the entrance hall to share my pictures?
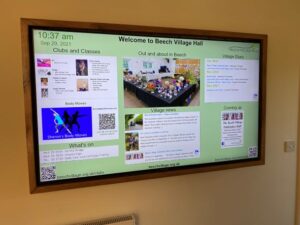
If you have booked one of our packages you are welcome to use our digital signage system. The system includes:
- The large TV screen in the main corridor
- A smaller monitor in the lounge bar area
- Software to schedule the dispaly
For example, you might want to show a static welcome page, a table plan or a scrolling selection of family photographs.
You will need to provide us with the material one week in advance.
You will need to provide us with:
- A Powerpoint, pdf or .mov file containing the material you wish to show, at least 7 days in advance of the hire date.
- By default, we will schedule your material so that it appears on the screen during the hours you have booked the Hall. If you only want it to show for a specific period of time, let us know.
- If you provide a multi page PDF or PPT file, each page will appear for 5 seconds by default. This can be adjusted if you let us know how long you want each page to appear for.
Please note:
- The TV screen is managed remotely by us and you will not be able to make any changes onsite.
- There is no provision for sound on this system.
- It is your responsibility to ensure that you have the appropriate approvals to use the material you send us. This may include copyright or a licence for images, and permission from people appearing in the pictures (or, where applicable, their parents or guardians).
- To deliver this service, we will upload the file you provide onto the platform of our service provider, Yodeck. We will delete all your materials from the platform shortly after your event
How to use the DIshwasher in the kitchen?
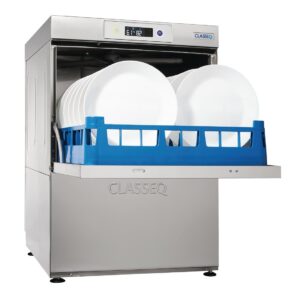
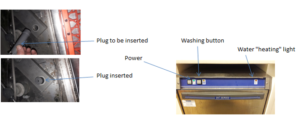
The dishwasher is a ‘commercial’ dishwasher. Unlike a home dishwasher, the system is reliant on pre heating the water to enable a rapid cycle time. This works well if you follow a few simple instructions
- Allow 20-40 minutes for the machine to pre-heat
- Always rinse food debris off the plates before washing
- Always remember to follow the draining down instructions at the end of the event
To operate the dishwasher please use the buttons on the front of the machine:
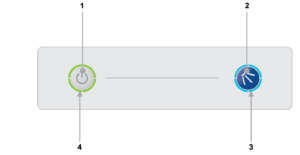
- On/Off button
- Cycle button
- Cycle indicator
- Heating indicator
Turning on the machine
To turn on the machine ensure the door is closed and press the On/Off button (1) on the keypad of the machine, the display will illuminate, the machine will start to fill automatically as long as the door is closed.
Once the wash tank is filled and both tanks are up to the required temperatures the heating indicator will illuminate green to indicate the machine is ready to run a cycle.
- This will take approximately 20-40 minutes.
- During the fill stage the heating indicator (4) will flash amber.
Loading a basket
Before loading a basket rinse off any food waste:
- Always remove excess food/debris from any dishes/glasses to be washed. DO NOT use the machine as a waste disposal unit.
Long cutlery, such as ladles and long knives etc., must be placed horizontally on the open basket this will avoid possible collision with wash/rinse arms.
Starting a cycle
To start a cycle, follow the instructions below.
- Open the door
- Load the full basket, ensuring that bottom and top arms rotate freely.
- Close the door
- Press the cycle button (2).
- The cycle will start once the machine has achieved its correct water levels and temperatures.
- During the cycle the blue cycle indicator (3) will be illuminated blue.
- The cycle will run for approximately 3 minutes.
- At the end of the cycle, once the cycle indicator (3) has gone out. Open the door and remove the basket
- Reload the machine and repeat as required.
Please note:
- Do NOT open the door during a cycle
- The machine has a heat interlock to ensure that the rinse is in accordance with environmental health requirements. This will extend the wash cycle if the rinse boiler has not achieved the required temperature.
- If the cycle button is pressed before the machine has reached the required levels the cycle indicator (3) will illuminate blue to indicate that a cycle has been selected, the heating indicator (4) will flash amber and the machine will automatically start when the requirements have been met.

items in the basket may be wet and will dry in a short time due to evaporation.
Be aware: Items may be hot when removed from machine
Draining down the machine
It is very important the machine is drained down at the end of each working day. To fully drain down the machine follow these instructions:
- Close the door to the machine
- Press the On/Off button (1) to turn off the machine.
- Press the cycle button (2)
- The cycle indicator (3) will flash blue.
- The machine will drain down the wash tank.
- The machine will do a self-rinse.
- When the cycle indicator (3) goes out the drain cycle is complete.
How to use the sound system?
The easiest way to use our sound system is via a Bluetooth connection.

- You need to be in the far right corner of the main hall to connect
- You should connect your phone/laptop to the device named ‘Adastra’
- You will then be able to play music from your phone/laptop and also control the volume level.
Please note:
- Connect to our wifi first to improve streaming
- You will need to keep your bluetooth device within range of our amplifier
Alternatively, you can connect by cable:
 We have male jack plus that you can plug into a computer or mixing desk. Please contact us so we can help you set this up.
Is there a limit on the volume of music?
As we are located in a quiet and peaceful village with close neighbours we specify a maximum noise level in our terms and conditions.
- We ask that windows and external doors are closed when loud music is being played inside the hall.
- We prohibit the playing of music outside of the hall without our express permission.
We have a number of system to help monitor and control noise levels:
- A sound decibel meter to enable hirers to understand the noise level in real time
- A noise monitoring service provided by Minut that records the noise level in the hall. Please note that we do not record conversations. Please use this link for the Minut privacy policy
- A noise limiting system. The noise limiter has two parts”:
- A ‘traffic light’ display in the main hall. The light flash orange as the noise level nears the limit and red when the limit is exceeded
- A power cutout to the main hall when the noise limit is exceeded for more than 10 seconds.
What format of digital file do you require to use the screen in the entrance hall?
For the large screen in the entrance hall you shoud create a single digital file:
- Landscape format with an aspect ratio of 1920 x 1080 (16:9)
For the small screen in the lounge/bar area:
- Portrait format with an aspect ratio of 1920 x 1080
We can process most file formats eg PPT, MOV, JPG and PDF.
We request you limit the size of the file to a maximum of 100Mb.
We hope this covers everything you need to plan and prepare for a successful event. We also have our Frequently Asked Questions page and should you have any problems our Problem Reporting page
For further information, please e-mail us or call 07501 187496 (office hours only).
How to hire the Marquee?
We have a large Marquee measuring 6m x 12m and this can be placed on our village green outside the hall. The Marquee has side panels but does not have a floor.

The Marquee is available for hire where the hirer commits to set up and take down the Marquee.
- Setting up and taking down the Marquee requires a team of 10 people for 2-3 hours
- The video below steps through the process for a similar marquee.
How to keep us all safe?
In signing up to support our community we ask our volunteers to understand and comply with our core values and beliefs as defined in these policies:
How to report a problem or incident?
Here the numbers to call for immediate help. After the incident please ensure the details are reported using this Problem reporting form or email [email protected]
In case of Accident, Injury or Safeguarding concern:
|
What |
What/Where |
Call |
|
Emergency |
|
999 |
|
Not sure what to do? |
NHS 111 can help if you have an urgent medical problem |
111 |
|
Defibrillator |
Outside the front entrance on the right |
(dial 999 for assistance) |
|
First Aid kit |
In the Village Hall kitchen |
|
|
Hospital A&E |
Basingstoke NHS Foundation Trust, Aldermaston Rd, Basingstoke, RG24 9NA |
01256 473202 |
|
Doctors Surgery |
Chawton Park Surgery, Chawton Park Road, Alton, GU34 1RJ |
01420 542542 Out of hours: 0208 390 9991 |
|
Safeguarding |
Emergency |
999 |
|
Child or Adult in danger |
101 |
|
|
Report a concern about a child |
0300 555 1384 |
|
|
Report a concern about an adult |
0300 555 1386 |
How to submit an expense claim?
To be reimbursed for expenses incurred in supporting our Charity please use this online form:
The form is primarily designed for submitting claims for baking and milk expenses for our Coffee shop but you can use it for other expenses:
- You will need to provide your bank details (if we dont already have them)
- Please remember to scan and attach a receipt
- Expense are normally paid monthly so please let us know if yours are urgent
How to use Zettle point of sale (PoS)
How to use our Zettle point of sale system?
Beech Village Hall has 2 Zettle Point of Sale systems already set up for taking payments.
We can use the system to take payments for food, drinks and tickets using:
- Cash
- Card
- Payment links
To use one of the systems you will need:
- Access to the one of the machines
- The PIN code to access the system
- Please email [email protected] for this
- To ensure the iPad and card reader are charged
- Or alternativlely, you can set up your own device or web browser to take payments
- Please email [email protected] for help on setting this up
To use the Zettle app
- Turn on the iPad
- Enter the PIN code
- Check you are in the Zettle app, if not select the Zettle app from the menu
- Navigate the screen to select the items you wish to add to the ‘shopping cart’
- You can select an item multiple times or update the quantity from the shopping cart.
- Select payment type
- We prefer to not accept cash if we are handling food as if you touch money you MUST wash your hands
- We prefer card payments, just select ‘Card’
- The iPad will then connect to the card reader
- If you have problems connecting to the card reader you can go into the settings menue and attempt to reconnect to the reader.
- The card reader will display the amount and the customer can tap or insert their card or phone
- Sometimes customers are required to insert their card and enter their PIN
- Once payment is confirmed you will be given the option to email a receipt to the customer, to do this you/they will need to enter an email address
|
Sell
|
1. You should be at the ‘Sell’ screen on the iPad 2. Select product. If you make an error you can delete and start again 3. Tap ‘Card’ button at bottom right of screen (if cash or card is enabled) 4. The amount should now be displayed on the card reader 5. Ask the customer to tap or swipe their card |
|
Receipt (sent via email) |
1. Click the button in the top left of the iZettle screen 2. Select the ‘Receipt’ menu item 3. Identify and select the transaction by the amount and last 4 digits of the card 4. Click on the ‘envelope’ icon at the bottom of the screen 5. Enter the email address of the customer |
|
Refund |
1. Click the button in the top left of the iZettle screen 2. Select the ‘Receipt’ menu item 3. Identify the transaction by the amount and last 4 digits of the card number 4. Click on the transaction 5. Click on REFUND 6. The customer will then need to represent their card. |
|
Free drink for Bar staff
|
1. From the SELL screen select the drink 2. On the right hand side press the discount button 3. Enter 100% 4. Enter cash and finish the transaction 5. Please note the discount applies to the entire shopping cart |
iZettle problems
|
No connection to card reader |
Check reader is powered on and has charge |
Power button is top right of iZettle card reader Plug into charger |
|
|
Check reader is connected to iZettle software |
From iZettle app on iPad: Click top left menu button Select ‘Settings’ Select ‘Card reader’ Check status
|
